My recent sewing adventures

I am so delighted to be asked back to be a part of Sew Crafty online shops Design Team again. Chosen to create projects using supplies from their fabulous shop. For my main project I chose to make a pinafore tunic dress using Sew Me Something’s ‘Beatrice’ pattern with denim fabric, I also made two smaller projects; an infinity scarf from jersey and lace and an upcycled lamp using a pattered cotton fabric. Doing these projects has definitely reignited my love of sewing after a long break.

The ‘Beatrice’ pinafore dress 


I saw the Sew Me Something ‘Beatrice’ pattern on Sew Crafty’s Online shop and it appealed to me straight away. It looked like it would be a really comfortable garment, perfect to wear over pyjamas clothing to get busy crafting in.


I debated about which fabric to make the pinafore in, I couldn’t decide between linen or denim. Eventually I picked a medium denim, because I thought the thickness would make it more hardwearing, and it wouldn’t need to be ironed as much. The pockets are also a great size for keeping bits and bobs in such as tape measures and chalk etc. They fit a phone perfectly too.


I have a very care free (alright lazy) sewing style and am not very good with following patterns and being precise. I usually prefer to wing it when making a garment but when I do plan on making something using a pattern I look for easy to follow instructions and simple pattern pieces. The ‘Beatrice’ pattern ticked both boxes. The pattern would even suit beginners, as it has straight forward instructions and no complicated techniques are needed. 


The paper pattern itself was also simple to cut out.


I used a dark blue binding I had already to cover the upper edge of the pockets, there are loads of bindings to choose from on Sew Crafty Online. A contrasting colour of binding could make the pockets stand out.
   

Half way through sewing the pinafore I decided to unpick most of it to do a double hem around the edges as I was worried they would fray with just a single hem. Overlocking or shearing with pinking shears the edges are other options you could try.

The crossover back.

I found the most difficult aspect of sewing the pinafore was hemming the curves of the back pieces and the pockets. There is definitely a knack to hemming a curved edge! Ironing the curved edges over first helped a lot. With a bit of trial and error, unpicking, ironing and pinning I got the hang of hemming a curve. Phew!


Overall, I am very pleased with the result of the pinafore. It is a very comfortable garment to wear, I thought it might feel a little heavy but it doesn’t at all. There are no zips or buttons to bother with, just put it over your head and put your arms through, easy on and off. I can see myself wearing it often. 

I would definitely recommend trying the ‘Beatrice’ pattern and using medium denim as it was very easy to sew, just enough stretch in it, hardwearing but not stiff or heavy, really comfortable.

Infinity Scarf


This month I’ve also had a go at making an Infinity Scarf out of Jersey and Lace. I followed a tutorial on Youtube and I managed to whip it up quite quickly. I love the colour of the jersey and absolutely adore the black lace, its gorgeous.


I was little nervous sewing with lace for the first time but it was actually a joy. The only tricky part was hand sewing the three inch gap that I used to pull the fabric through the right way at the end.


My tip would be to try and make sure when cutting pieces of lace to avoid parts of the lace with large holes. You could hem the lace first so you sew through two layers of lace to make it feel sturdier. I plan on making a few more infinity scarfs, they are nice to give as gifts too.

Upcycled lamp


I also upcycled a lamp using a lovely fabric called Blend Folk Music Melody Collection Chimes Blue which is actually under half price right now (only £2.50 per half metre, was £6.04) in Sew Crafty’s shop. No sewing was required for this project, just cut out enough fabric to cover the shade and leave an extra inch to fold over the edge and glue, done!

Please check out my fellow Design Team members projects using the hashtag #scdesignteam on Instagram. They are so talented. I would love to hear any feedback on my projects or hear about any projects you are doing in the comments section.

How-to make fabric postcards


It is no secret that I am a huge snail mail fan and I’m always on the look out for ways to make my mail unique. A while back I had the idea to make postcards out of fabric which could be sent and the receiver could keep as keepsakes. I knew exactly how I was going to do it. Being able to choose fabrics from the Sew Crafty shop as a part of the Sew Crafty Design Team made it so much more exciting, they have such a gorgeous selection to pick from. I chose some lovely fabrics that I think make nice postcard fronts. Here is how I went about making the fabric postcards:


You will need:


Step 1. 

Cut out 2 rectangles 19 cm’s by 15 cm’s (approx 7.5 inches x 6 inches): one in white fabric for the writing side and another one in a patterned fabric.


Step 2. 

On the white fabric rectangle draw out your written message and postcard lines with chalk or a fabric pen with erasable ink. Then using embroidery thread (dark colours like black work best) sew on top of what you have drawn using a running stitch or backstitch.


Not a fan of embroidery? Why not use a fabric pen instead. I did this for the address below. A pen for labelling works as it is permanent. I already had a pen but there are a variety of pens available.


Step 3.  

The next step is the stamp.

Option A.

Stamps out of fabric. Cut a small rectangle out of white fabric (cotton, felt or leather. I used leftover interfacing!). Then use pinking shears to cut a zig zag shape around the four edges. Cut a smaller rectangle out of patterned fabric. Then sew the smaller patterned fabric on top of the white zig zagged rectangle. Finally, sew the stamp to the right corner of the writing side of the postcard leaving a margin for when the postcard is sewn together.


Option B. 

This option is if you would like to actually send your fabric postcard through the mail. Simply sew a rectangle piece of flexible clear plastic (such as that from an old travel card wallet) to the right hand corner of the white (writing side) fabric. 


When sewing on your plastic leave a margin for when the front and back fabrics are sewn together.


Step 4. 

Place your 2 rectangles of fabric right sides together and pin in place. Then sew along three sides (1cm from edge), leaving one short side open. 


Trim the corners and turn the postcard the right way round.

Step 5. 

Put your piece of card inside and fold in the open edges. Iron the folds (don’t use steam as this will make the card inside soggy) and pin together. You can invisible stitch the opening closed or sew it closed with a sewing machine in the final step, where you sew all around the edges.


Step 6. 

Finally, sew around all four sides approximately half a centimetre from the outer edge. 


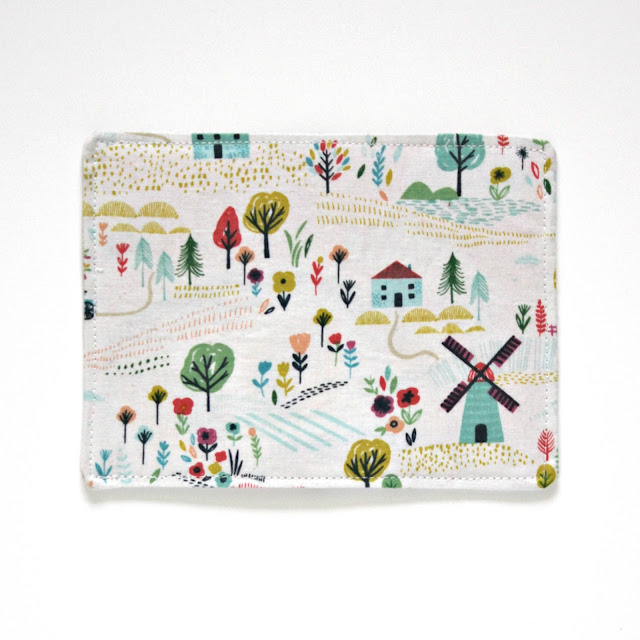
Here is how the fronts of the postcards looked above. The pink one is actually a pouch.


Here are the backs of the postcards showing the two different types of stamps.

Pouch option: 

If you would like to send a secret letter in your postcard you can turn it into a pouch. You can do this  by sewing a zip either at the side or along the top.


For the pouch above I sewed the zip along the top edges of the fabric then sewed together the remaining three sides (right sides together) using a 1cm margin. I then turned it the right way around and gave it a quick press with an iron. Put a piece of card inside for stability if it is to flimsy. You could keep it as a pouch for yourself and not send it at all if you wanted. Would be great for storing letters or pens.


Would you like a fabric postcard in the mail? Would love to know your thoughts in the comments section below.

Yay! I’m part of a design team.

I am delighted to announce that I have been selected to become a member of the Sew Crafty Design Team. There is more about it on the Sew Crafty blog but it basically involves me and the rest of the chosen team (a bunch of super talented ladies) sewing some exciting makes with Sew Crafty shop products. So I get lovely things in the mail and an excuse to make stuff, what a result! 


What better welcome to the design team than a gorgeous craft journal. I was gifted the journal for joining the team. Not only is it stylish but also very helpful in planning craft projects to. The journals definitely make great gifts for craft enthusiasts. The Sew Crafty shop have a variety of gorgeous journals to pick from, I picked the pink one and started using it straight away.


Eeep! Getting my first lot of sewing goodies in the post was SO exciting. I managed to contain my excitement momentarily while I took the photo. How cute are those buttons?


I got to work on my first make which was to be a travel writing folder. I had chosen the Aqua Blueberry Park fabric as the cover and the Pink Sevenberry Yarn Dyed cotton for the inside lining and pockets along with the matching threads.


Above is how the finished writing folder looked closed. I made the folder by first working out the size I needed it to be, including seam allowances. I cut the fabrics out (cover side and lining side) to the right size. Then took the lining fabric and sewed pockets onto the right side of the fabric. I sewed the front cover (which had already been backed with heavy weight interfacing) to the lining, right sides together, leaving the bottom part open. I turned the cover the right side out and inserted cardboard into the opening. I then hand sewed the opening closed using invisible ladder stitch


Despite being a lot trickier than anticipated, I am happy with the final result. I had planned on doing a tutorial for the writing folder but there was SO much trial and error that it became difficult to give accurate instructions. If I get a chance I will sit down and work out exactly how I did it with measurements. I would also like to make a bigger writing folder in the future with handles. 


The Sew Crafty craft journal came in very handy in planning my next project. Jotting down your plan and what went right and what didn't really enables you to learn from each project you do.


After quite a tricky first project I decided to go for a simpler project next. Using some gorgeous Dashwood Nature Trail fabric I made some cute fabric baskets to store some craft supplies in.


Here are my finished fabric baskets. I have a couple more exciting projects planned including a mail themed make which I will be sharing a tutorial for next time.

Upcycled trinket holder diy


I have been on the look out for a trinket holder for a while now, but have had no luck in finding one that I like and can afford. So I decided to make my own one out of things that I already have at home. After a dig around in my recycling and craft supplies I found some items I thought I could use. Above is the result! A completely upcycled trinket holder.

If you would like to have a go making your own one this is what you will need: 


All you need to make a trinket holder is: 

3x same size jar lids (I used lids from pasta sauce jars), a cotton spool, a marble or a bead, a glue gun and spray paint. If you would like to have patterned paper on the inside of your lids you will also need paper, craft glue and scissors.


    How to make it:

    • Clean jar lids and dry.
    • Position lids together in a triangle shape and using a glue gun, glue the edges where the lids meet.
    • Glue the end of the cotton spool to the center of where the lids come together
    • Then glue the marble/bead on top of the cotton spool
    • Take the trinket holder outside or to a well ventilated room and spray paint it ensuring even coverage. It may need 2-3 coats of paint, let it dry in between coats.
    • Once dry you can either leave the trinket holder as it is or insert patterned paper to the inside of the lids for added colour. To make paper circles just find an item with a circular bottom (that is the same size) and use it as a template to draw circles on to your paper. Cut the circles out and glue to the inside of the lids. If you want to add a glossy effect to the paper when its inside the lids coat it with modge podge (or 50% pva glue mixed with 50% water). 

    I hope you have enjoyed my trinket diy, let me know in the comments section below what you thought.

    How to turn a plastic bottle into a plant pot


    Do you like to put your plants in nice pots, but can't find anything you like in the shops? You could have everything you need to make the perfect pot at home, for free! With just a plastic bottle and some scrap fabric you can make some lovely, totally unique plant pots. I will show you how with this easy DIY.


    All you will need is:
    • A plastic bottle. One that is wide enough at the bottom for your plant to go in and has a smooth surface.
    • A small plant.
    • Enough fabric to cover your pot (thin or medium weight fabrics work best). I used some fabric from a previous upcycling project and a bandana.
    • Scissors.
    • Glue (I used Modge Podge but you can use 50% pva glue and 50% water, which is basically the same).
    • A paint brush or sponge.

    1. Start off with preparing your plastic bottle. Wash, dry and remove any labeling.
    2. Measure from the bottom up how tall you want your pot to be (using the size of the plants original pot as a guide). Then mark around the bottle with pen or with washi tape where you will need to cut. Cut around the markings on the bottle. You should be left with the bottom part of the bottle which can now be used as a pot. Measure your fabric and cut out, making sure you have enough to fold over the top (approx 1-2 cm's) and cover the bottom.
    3. Apply glue to the outside of the pot.
    4. Cover the pot with the fabric, smoothing it over as you go.
    5. Glue down the top edge. 
    6. Then glue down the fabric to the bottom of the pot. Depending on the type of finish you want you can either leave it as it is now or if you would like a shiner finish apply a coat of modge podge to the outside.


    So that is how you can make a plant pot from just a plastic bottle and some fabric. Hope you enjoyed this DIY, I would love to hear your thoughts about it in the comments section below.